
|
TSD Telematics
TSD Telematics is sold separately. Contact your TSD Sales Representative at sales@tsdweb.com for more information.
TSD DEALER’s Telematics integration adds a new dimension to your fleet management, providing real-time GPS fleet tracking and telematics to save you valuable time and money, so you can:
- Track your fleet in real-time with GPS tracking to view the exact location of your fleet and recover stolen vehicles
- Set geographic boundaries so you can receive immediate notifications when units leave your business or enter restricted areas.
- Create a faster check-in experience and recoup fuel and mileage costs with precise, automated fuel and mileage tracking on agreements (no need to check the car and manually enter fuel/mileage readings).
To view a tutorial for this topic from the web application, click the Tutorials icon ( ), or to view a list of available tutorials.
Setup Requirements for Telematics
Prior to using the TSD Telematics on the web and/or mobile app, make sure you do the following:
- Make sure unit statuses and VINs are accurate. Verify that unit information, including VINs, is up-to-date, and remove any units from the fleet that are not active. See "Remove a unit from your fleet" for more information.
- Plan to charge for fuel? Set up fuel pricing to recoup fuel costs. Set up a Fuel Charge per gallon using the Fuel Charge management setting, for automatic, accurate fuel charges.
- Plan to charge for miles driven? Set up a mileage charge. Set up a per-mile rate and any number of free miles offered on every agreement using the Mileage Charge management setting, then turn on mileage charges within your Rate Codes, so accurate mileage charges can be calculated at return.
- Grant employees permission to view GPS locations, if applicable. If using the GPS location tracking component of the integration, make sure employee roles have the Access to Map permission to view GPS information, if allowed on the agreement.
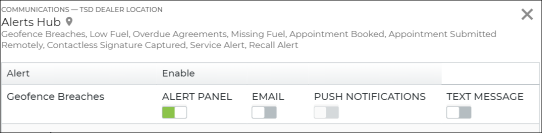
- Turn on Geofence Breach Alerts. The Telematics Hub offers geofencing capabilities to let you set geographic virtual boundaries, or geofences, around an area so you can be alerted when vehicles leave your parking lot or otherwise designated service area. Make sure your Alerts Hub management setting has Geofence Breach alerts turned on, then use the Geofence Breach Alerts management setting to toggle on the types of alerts you want to see.
- (Zubie) Authenticate your Zubie account so TSD can provide your Telematics provider with information. See "TSD Telematics".
- Onboard your units with Telematics. The onboarding process may differ based on whether you're using direct connect (device-free) or device-based Telematics, as well as your telematics provider.
Units are automatically onboarded with Telematics when a device is installed in the vehicle.
- (Zubie) After TSD turns on Telematics Integration for your location and you receive your telematics hardware, you must authenticate your Zubie account so TSD can provide your Telematics provider with information. See "TSD Telematics" for more information.
- Make sure the unit record with the correct VIN exists in the TSD DEALER system. Installing a telematics device before creating a unit record may cause device pairing problems.
- Install the telematics device in the vehicle by doing the following:
- Make sure the vehicle is turned off.
- Locate the On-Board Diagnostics (ODB-II) port, usually found under the driver’s side dashboard, below or around the steering wheel.
- Connect the telematics device to the OBD II port. Push to ensure the connection is tight. Proceed to use the provided cable ties to wrap around the back of the port and then around the device. Pull tight and trim excess tag. This will ensure the device always has a good connection. You will hear six beeps and all three lights on the device will flash briefly.
- Turn on the ignition. The device will beep as each one of the LEDs lights up. Green indicates cell connection, red indicates ignition detection, and blue indicates GPS latch.
- Wait for all three LEDs to come on. The installation is complete.
- Drive the unit for several miles to calibrate the device and so telemetry data can be received by the application.
- To view the status of the enrollment, go to the Telematics Hub.
- Connected: The enrollment was successful, and telemetry data for the unit is being received.
- Inactive: The enrollment was successful, but no telemetry data (fuel, mileage, or location data) has been received. Drive the vehicle for a few miles, so telemetry data can be received by the Hub so the status can be changed to Connected.
- Enrollment Failed: The enrollment was unsuccessful, due to an error. You can hover over the status to view more information, then take action.
- Once units are successfully onboarded, these units are tagged as “Connected Cars” in the application, so you can easily find them on the Fleet Hub or on the Fleet Operations dashboard. The Enable Connected Car toggle on the unit record is selected and unavailable for editing.
This feature is applicable for TSD Telematics. Contact your TSD Sales Representative at sales@tsdweb.com for more information.
The TSD Telematics Hub offers geofencing capabilities to let you set geographic virtual boundaries, or geofences, around an area.
Take this one step further and be alerted when vehicles leave your parking lot or otherwise designated service area.
To set up geofence alerts:
- Head to Admin > Management tab.
- Edit (
 ) the Alerts Hub management setting and make sure Geofence Alerts are turned on (Alert Panel, Email, and/or Text Message).
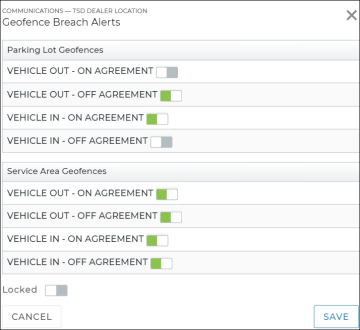
 - Edit () the Geofence Breach Alerts management setting.
- Geofence breaches are separated into two categories:
- Parking Lot Geofences: The boundaries of your location.
- Service Area Geofences: The area in which customers are allowed to drive units.
- Click .
Toggle on the types of geofence breach alerts you want to receive for units entering (IN) or leaving (OUT) these geofences when being assigned to an agreement or returning from an agreement.
For example, you may want the "VEHICLE OUT - OFF AGREEMENT" alert turned on for your parking lot geofences, as a unit shouldn't be leaving the lot when it returns from an agreement.
Access the Telematics Hub from TSD DEALER
Open the Telematics Hub for your entire fleet via the Telematics Hub button at the top of your screen.

You can also access the Hub for a specific unit:
- Search for the unit in the Fleet Hub and click .
- View the unit record and click the Map button on the side panel.
- Search for an agreement and click ; may be unavailable.
- View an agreement record and click the Map button on the side panel; may be unavailable.
Note: Restrictions may be in place when it comes to viewing certain units, such as those on agreements in certain states or those on agreements without an electronic signature.
Exploring the Telematics Hub
The Telematics Hub has a few key areas, all accessible via the menu at the top of your screen:

Hover to view the full-sized image.
- Alerts contains a real-time notifications about vehicle events, such as service warnings, collision detections, and geofence breaches.
- The Dashboard contains a snapshot of all vital fleet telematics data all in one place, so you can view a breakdown of geofences, vehicle health alerts, and telematics-related statuses at your current location.
-
The Fleet Map is a live, interactive view of your connected fleet, alongside key information in a grid that you can drill into by clicking a vehicle in the list. As far as the map goes, you can zoom in and out to view specific areas or the entire fleet at glance, and click a vehicle icon to view specific details.
- The Geofences map is a live, interactive view of your geographic virtual boundaries, or fences. You can create, edit, or delete geofences.
- Settings lets you define vehicle health alert thresholds, which determine when alerts are generated, as well as map layout. For example, set Low Fuel to 30% if you want an alert when a vehicle’s fuel is 30% full or less.
Hover to view the full-sized image.
Hover to view the full-sized image.
Hover to view the full-sized image.

Hover to view the full-sized image.
Alerts
Your panel displays real-time notifications about vehicle events, such as low fuel / battery, service warnings, collision detections, and geofence breaches.
Note: Define the thresholds for low fuel / battery alerts in your Settings.
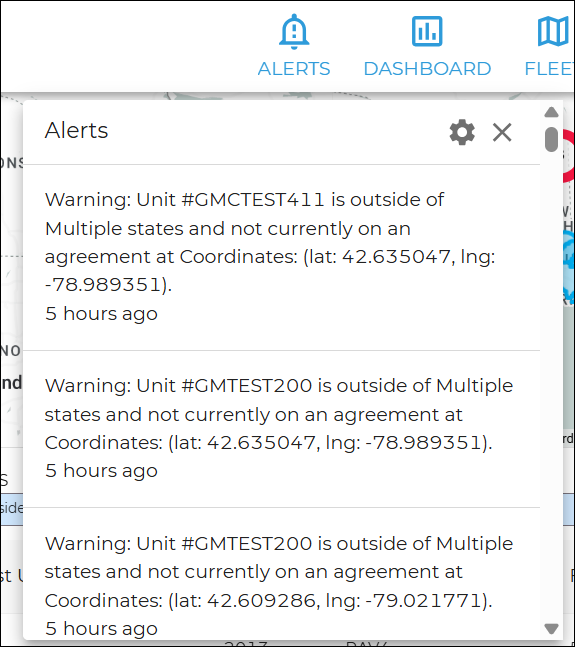
Hover to view the full-sized image.
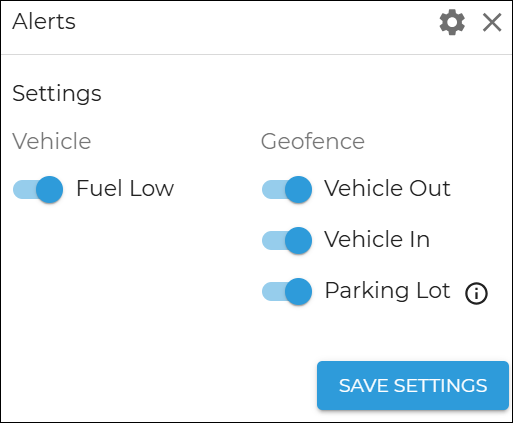
You can filter types of alerts using the alerts settings ( ), then choose which vehicle and geofence alerts you want to include:
- Vehicle alerts: Fuel Low, for low fuel / battery alerts
- Geofence alerts: Vehicle Out, Vehicle In, and Parking Lot geofence breaches (while on an agreement).
Hover to view the full-sized image.
Dashboard
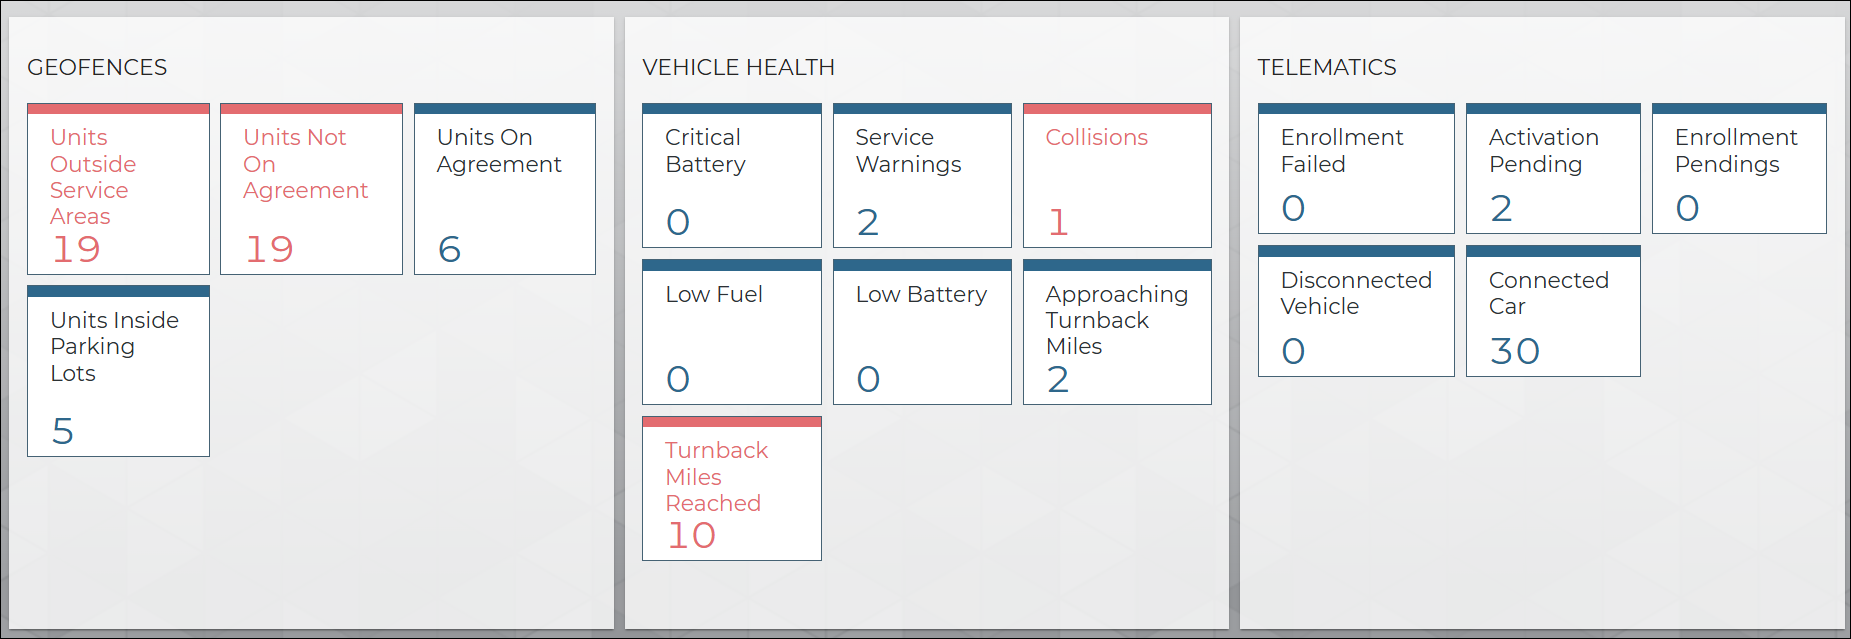
The shows you a snapshot of your fleet telematics all in once place.
View a breakdown of geofences, vehicle health alerts, and telematics connectivity statuses. Click a card to access those vehicles on the Fleet map.
Hover to view the full-sized image.
Geofences:
- Units Outside Service Area
- Not On Agreement
- On Agreement
- Units Inside Parking Lots
Vehicle Health:
- Battery Critical Low
- Service Warning
- Collision Detected
- Low Fuel
- Battery Low
- Approaching Turnback Miles
- Turnback Miles Reached
Telematics:
- Enrollment Failed
- Onboarding in Progress
- Drive Cycle Required
- Connected Car
- Telemetry Stoppage
Fleet Map
Your employee role must have the Access to Map permission to view the locations of fleet. See "Roles & Permissions" for more information.
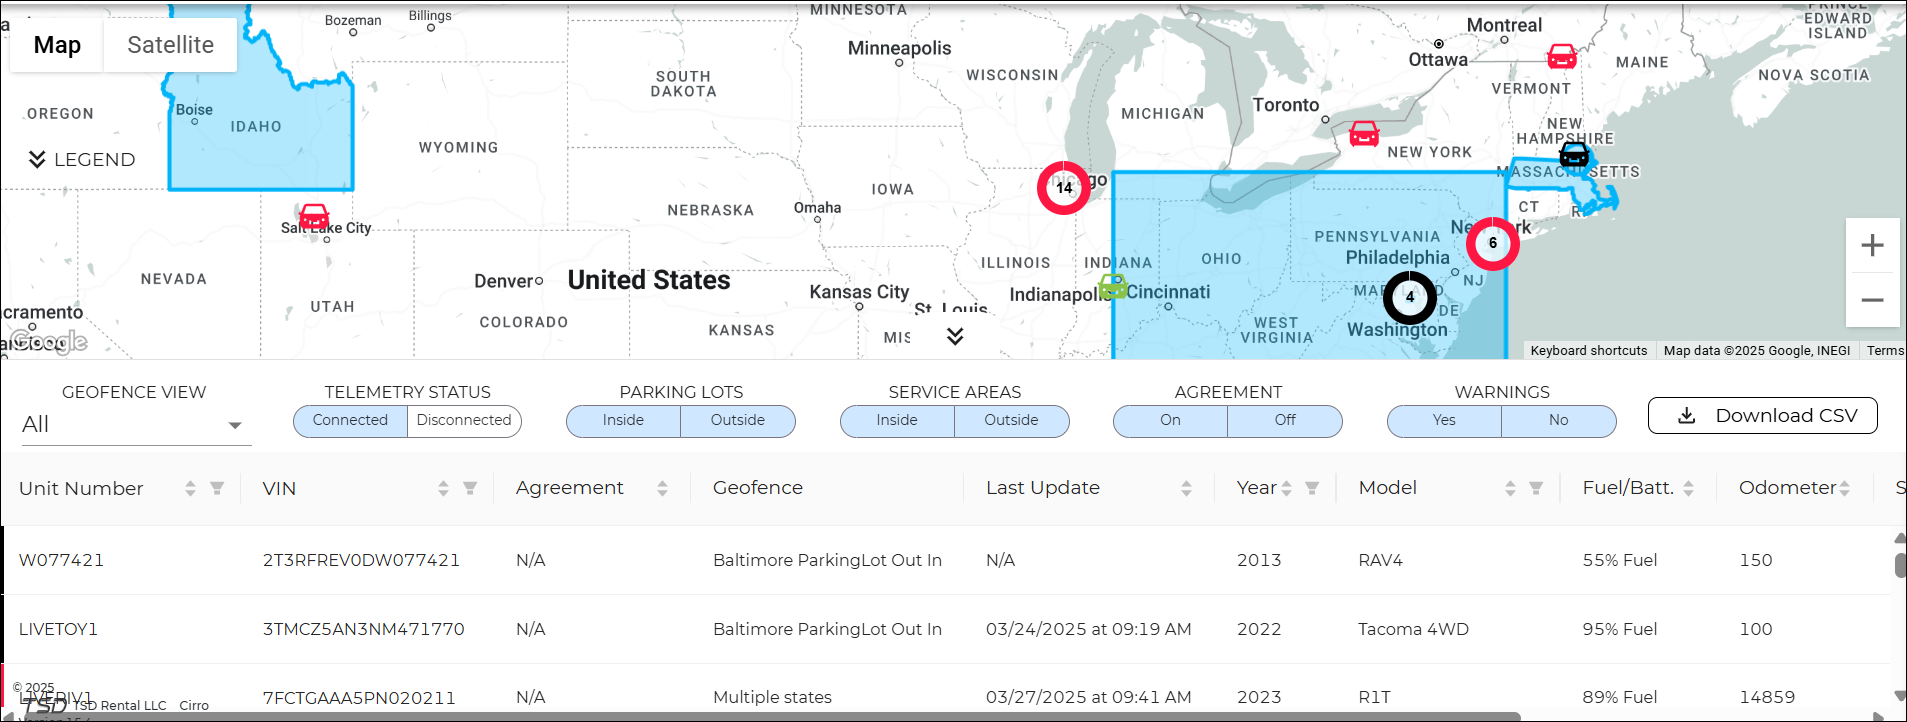
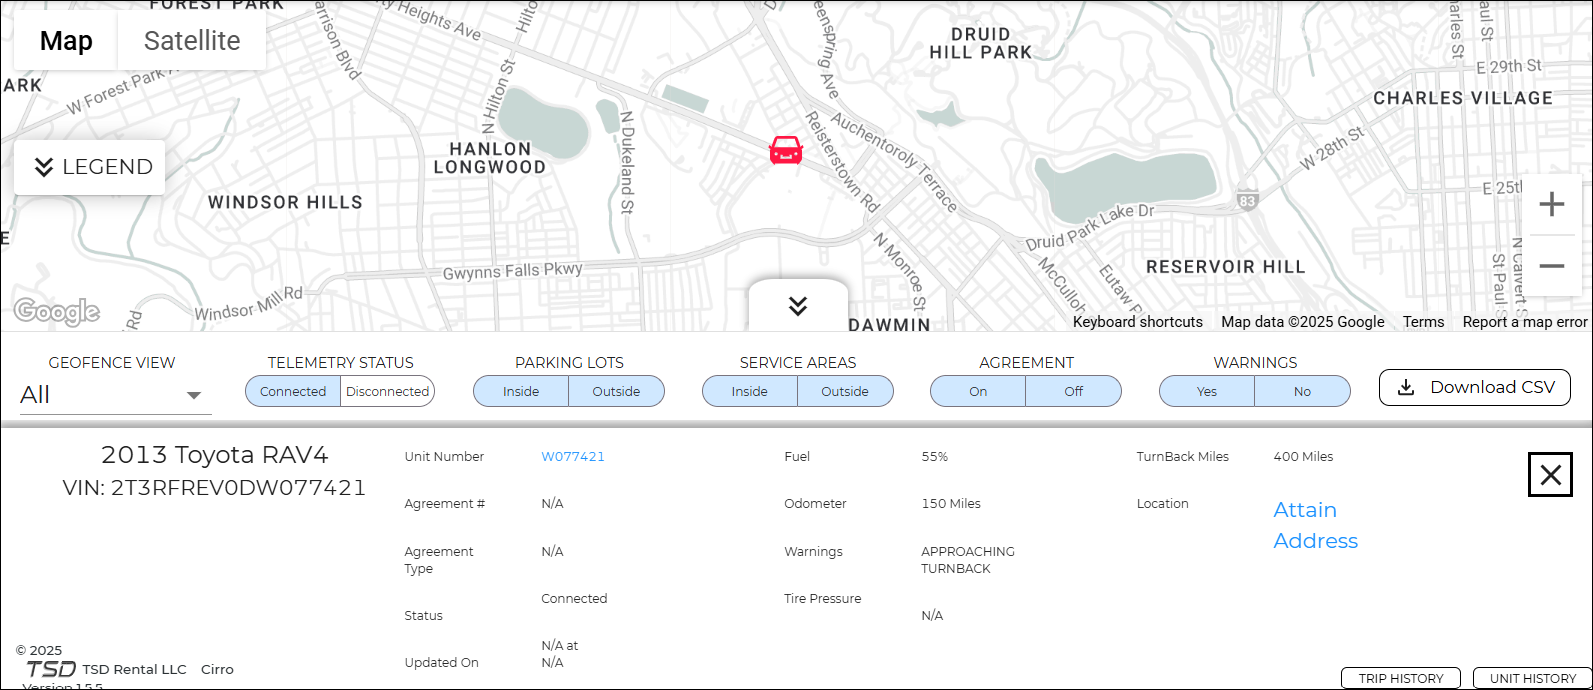
The menu brings you to an interactive, live map of your connected fleet, as well as key information in a grid. (You can close this, to view the map in full screen.)
The Map
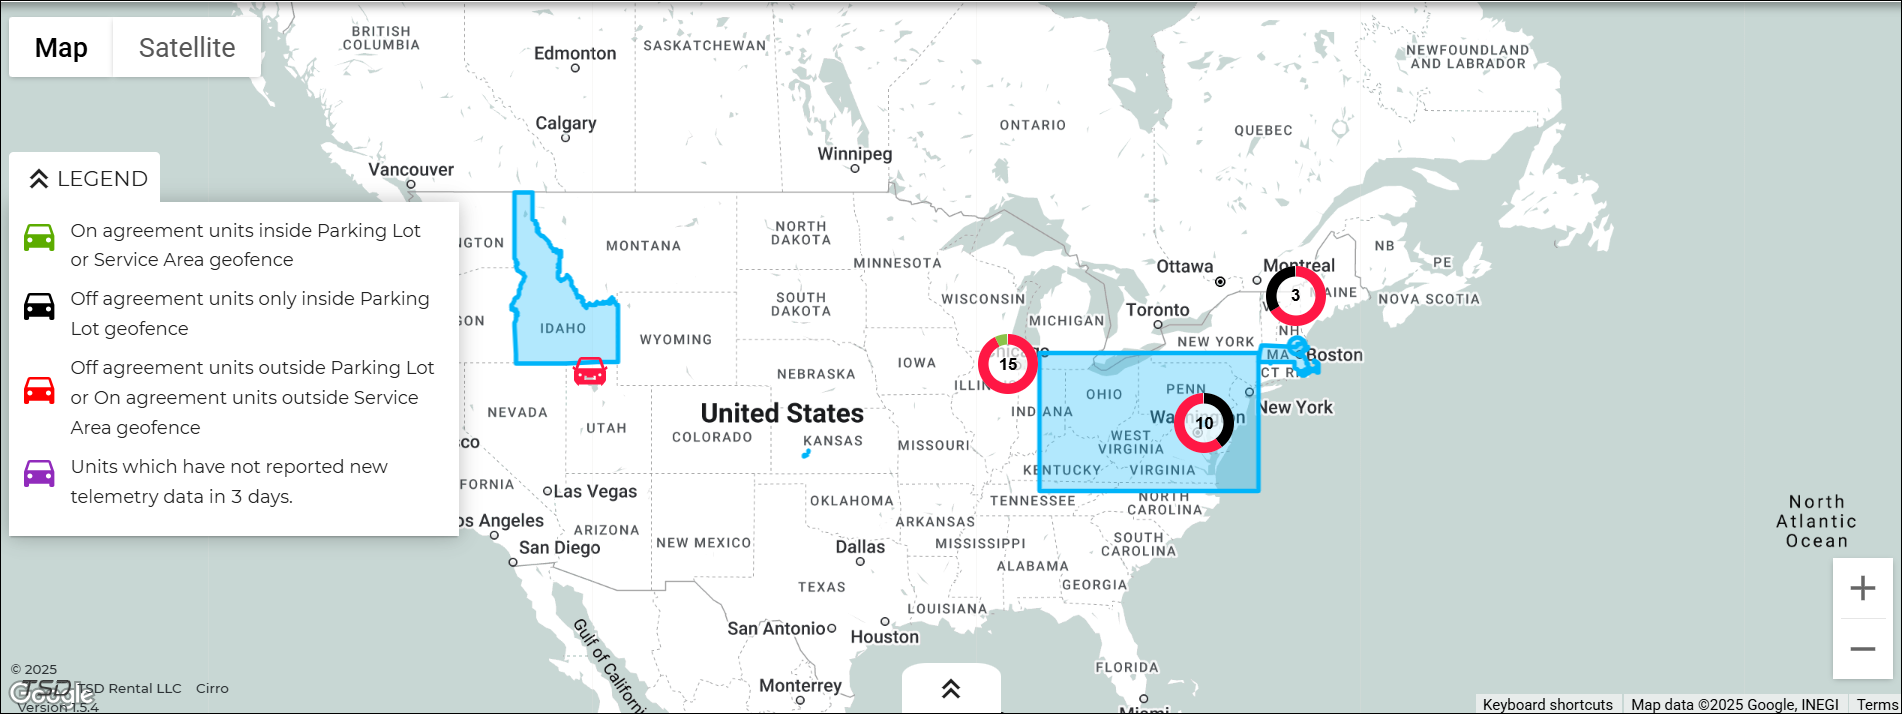
Hover to view the full-sized image.
On the map, you can:
- zoom in and out to view specific areas or the entire fleet at glance
- click a vehicle icon to view specific details
- expand the legend to understand the Hub's color-coding system for vehicle statuses (green for units currently on an agreement inside your parking lot or service area; black for sitting units inside your parking lot; red for sitting units outside your parking lot or service area; purple for units not reporting telemetry data in the last 3 days).
Note: In order to view a vehicle on the map, prerequisites must be met. ![]() Criteria for GPS tracking
Criteria for GPS tracking
The Vehicle Grid
Hover to view the full-sized image.
The grid, which is collapsible, contains a list of vehicles with key information.
Hover to view the full-sized image.
You can:
- filter the grid to narrow your view by geofences, telemetry status (connected or disconnected vehicles), vehicles inside or outside Parking Lots and/or Service Areas, vehicles on or off agreements, and/or vehicles with warnings
- hover over the Alerts column value to view the associated alert
- click the Download button to export the list to a .csv file
- select a vehicle to drill into more specific details, such as:
- Year, Make, Model, and VIN
- Unit Number; click the link to view the unit record
- Agreement details, if applicable, including Agreement Number and Type; click the agreement number to view the agreement record
- Status (e.g., On Agreement)
- Fuel, Odometer
- Warnings
- Tire Pressure
- Turnback Miles
- Location; click the Attain Address link to view the exact location)
- Trip History; see "View Trip History"
- Unit History; see "View Unit History"
This feature is sold separately. Contact your TSD Sales Representative at sales@tsdweb.com for more information.
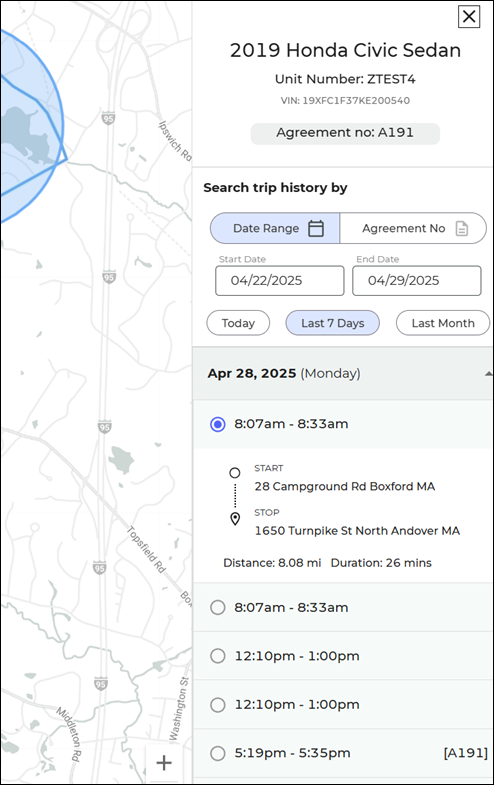
If you use the Trip History feature, you can view a vehicle’s past trips, whether to track stolen vehicles, make sure employees are not misusing vehicles, or to simply have more visibility into your fleet.
- While viewing details for a specific vehicle, click Trip History.
- The Trip History panel shows key information about the unit (Unit Number, VIN, and associated Agreement Number, if applicable), as well as history for the past 7 days, by default. You can change this period to today, the last month, or enter a custom date range.
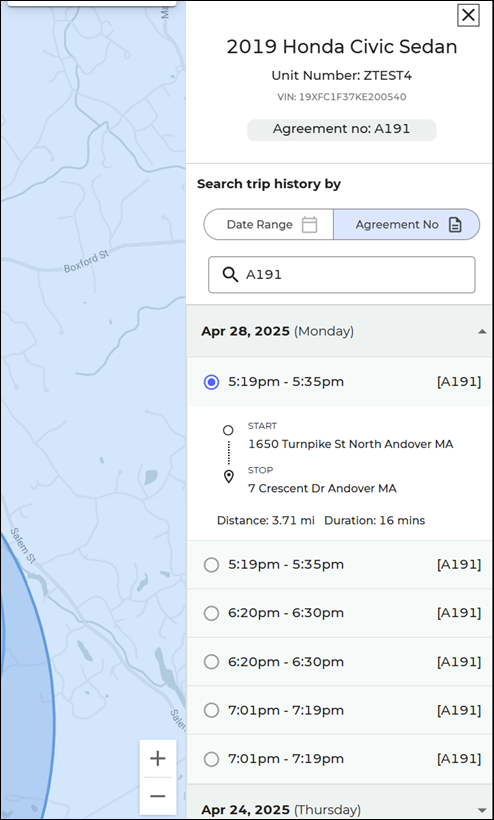
- Select a trip to view details (addresses, distance, and duration, as well as Agreement Number associated with the trip, if applicable), or switch your view to search trip history by Agreement Number.
|
By date range
|
By agreement
|
View a vehicle’s past trips, whether to track stolen vehicles, make sure employees are not misusing vehicles, or to simply have more visibility into your fleet.
While viewing details for a specific vehicle, click Unit History.
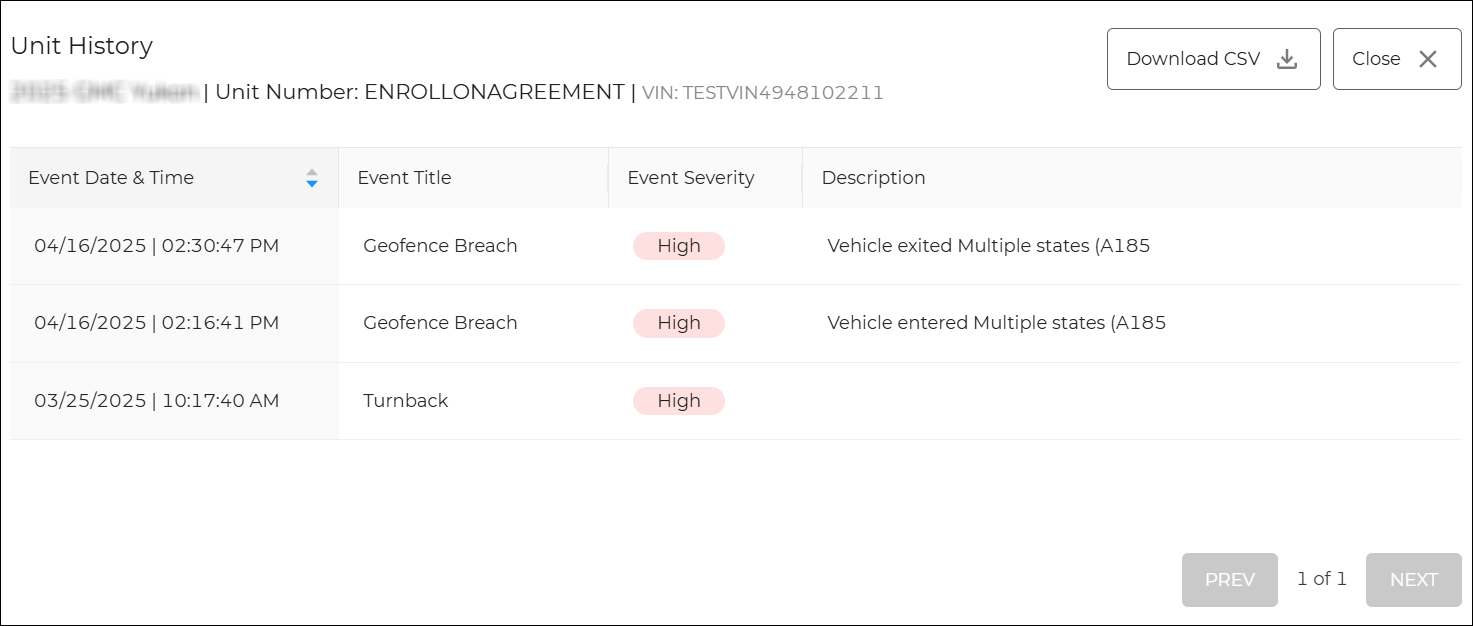
Hover to view the full-sized image.
Whether you're viewing a list of all fleet, or details for a specific vehicle, click Download CSV to export the information you're viewing into a .csv file.
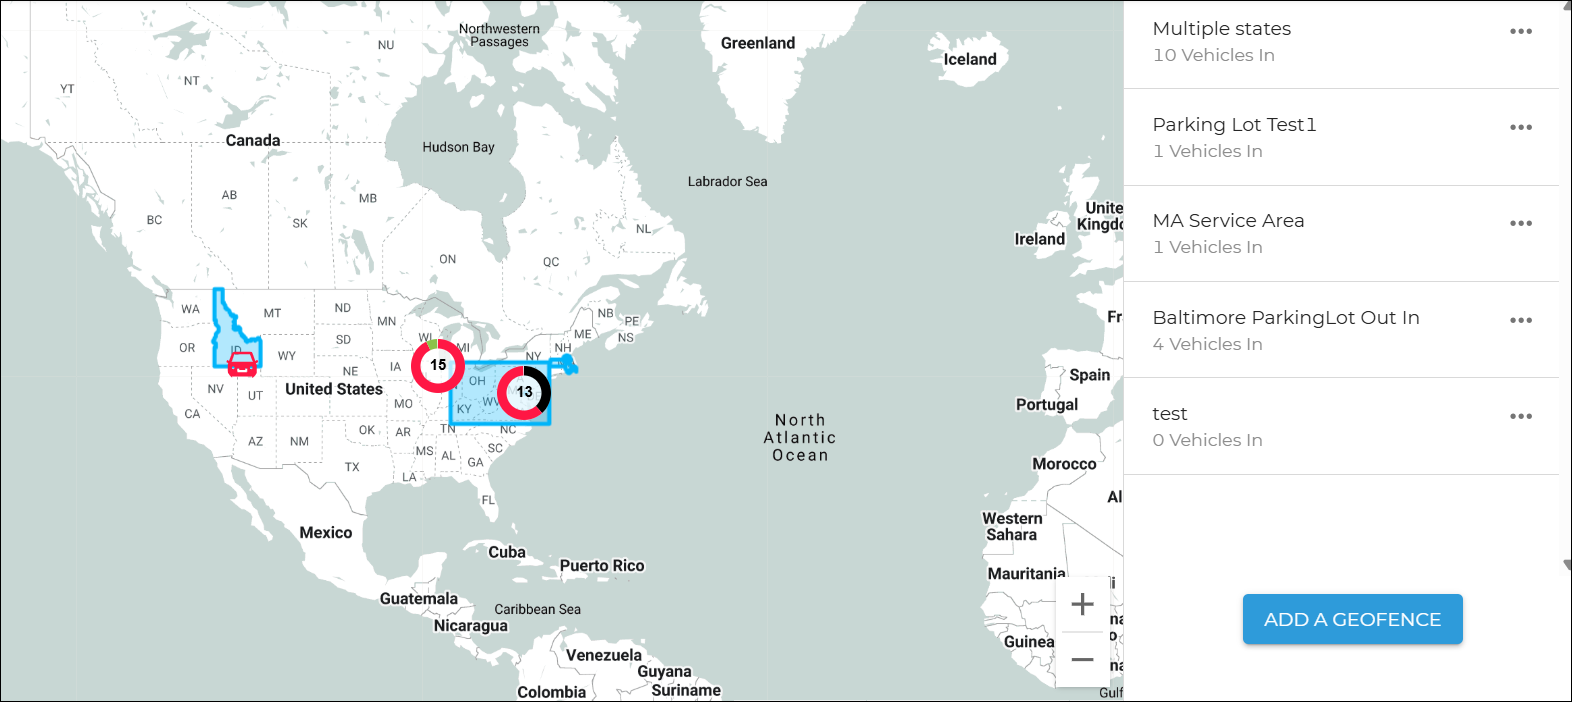
Geofences
Hover to view the full-sized image.
Geofencing capabilities let you set geographic virtual boundaries, or fences, around an area so you can be alerted when vehicles leave the lot or enter restricted locations (e.g., exiting states or the U.S.).
When you first open the Telematics Hub, geofences are outlined. Hover your cursor over a boundary to view the name and purpose of the geofence.
- Click the menu.
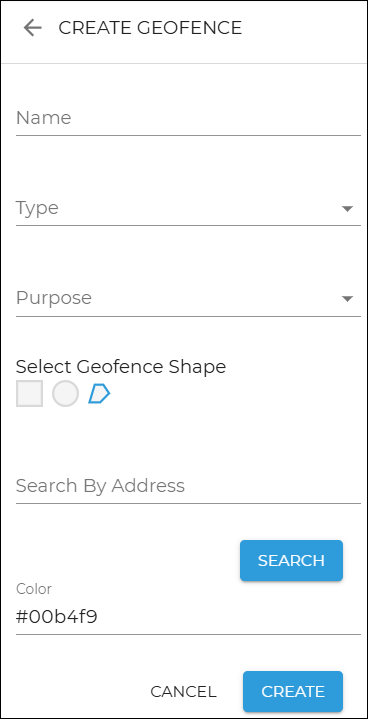
- Click Add a Geofence.
- Enter a name for the geofence, select a type (e.g., Custom or Premade), purpose (to outline a Parking Lot or Service Area), and geofence shape, radius in miles (if you chose a circular shape), and color. You also have the option of searching an address to pinpoint the area for which you want to create a boundary (e.g., a parking lot).
- Click Create.
You can turn on alerts so you can be notified when a unit leaves a geofenced area. See "Alerts" for more information.
Hover to view the full-sized image.
On the Geofences tab, click the geofence. Three tabs are available:
- Details tab, to view geofence details.
- Vehicles tab, to view vehicles located within the geofence boundaries.
- Alerts tab, to view geofence and vehicle-related alerts.
- If viewing the location and details for a single unit, click the back arrow in the details pane on the right.
- Click the Geofences tab. Any geofences you've set up listed and displayed on the map.
- Click the ellipses icon (
 ) next to the geofence and choose Edit Geofence or Delete Geofence.
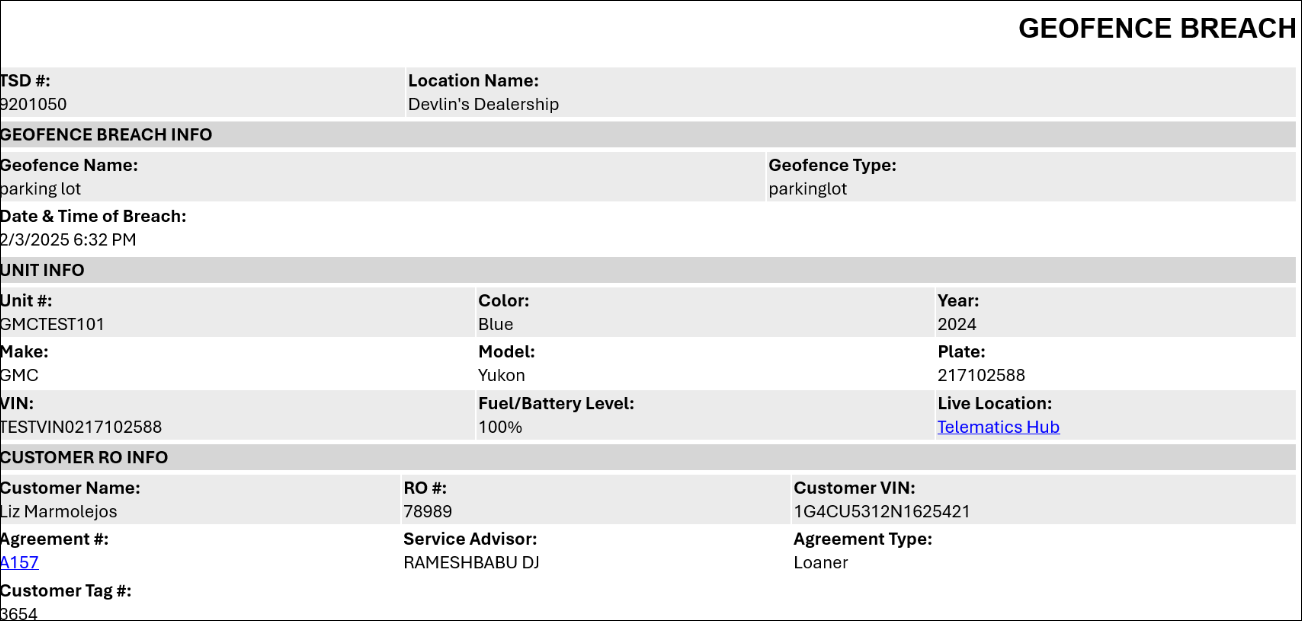
If you've set up alerts for geofence breaches in TSD DEALER, you can view these alerts in the Alerts Panel, email, and/or text message, depending on how you've set them up.
The Telematics Hub and Agreement # links in the emailed alert require you to be signed into the application.
Geofence breach alerts are logged in the unit history, accessible via the History button on the side panel of a unit record. See "Unit History (Event Logging)" for more information.
Emailed geofence breach alert example:
Hover to view the full-sized image.
Searches
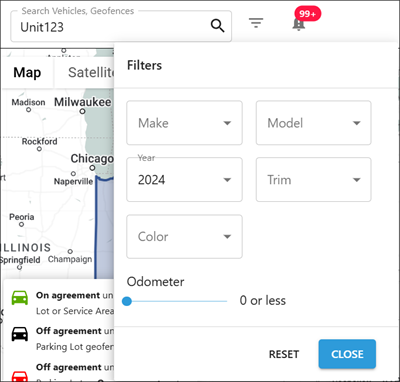
Use the Search bar in the upper left corner of the Telematics Hub to quickly locate a specific vehicle or geofence.
Use the filters ( ) to refine your search by Make, Model, Year, Trim, Color, and/or Odometer reading.
Hover to view the full-sized image.
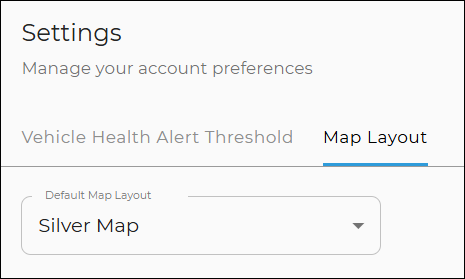
Settings
Use to manage your preferences. You can define the following:
- Vehicle health alert thresholds. These determine when alerts are generated:
- Turnback Miles Buffer (in miles)
- Low Fuel Level (%): When a vehicle's fuel is a certain percentage full or less.
- Low Battery Level (%): When a vehicle's battery level is a certain percentage charged or less.
- Critical Battery Level (%). When a vehicle's battery level is a certain percentage charged or less.
-
Map Layout: Choose whether you want the silver map or colored map.
Hover to view the full-sized image.
Hover to view the full-sized image.
Viewing Telematics in TSD DEALER
Note: In order to view fuel and mileage in TSD DEALER, prerequisites must be met. ![]() Criteria to view a unit's fuel and mileage:
Criteria to view a unit's fuel and mileage:
Precise, automated fuel and mileage tracking lets you recoup fuel costs, charge for miles driven, and streamline the agreement process (no need to check the car and manually enter fuel/mileage readings).
Make sure your unit records have the correct Fuel Capacity or tank size, so TSD DEALER can accurately calculate fuel levels.
A unit's latest mileage and fuel1 are filled in automatically when you do any of the following on the web or mobile app:
- View or edit a unit record. The Last Communication on a unit record displays the last date and time this information was received by the telematics device (Telematics ID). If TSD DEALER is having trouble connecting to the device, the following is displayed in at the top of the record: "Failed to connect to Connected Car device in unit [Unit Number], please check the device."
- Assign a unit. Data is filled in at open or during an exchange.
- Return a unit. Data is filled in at close or during an exchange
You can edit these fields, if necessary. If no data is found, these fields will be blank.
The fuel level percentage is rounded to the closest Fuel Level, Fuel Level In, or Fuel Level Out option in TSD DEALER. For example, if the fuel level is calculated to be 52%, it will be rounded down to 0.50 (half a tank). If 70%, it will be rounded up to 0.75 (3/4 tank).
An active unit is considered a "Connected Car" when it has a Connected Car device, if using dongle-based telematics, or if it is enrolled in direct connect Telematics. Connected Cars enrolled in Telematics have the Enable Connected Car toggle turned on in the unit record. Connected Car units, and agreements with Connected Cars assigned, have an additional tag ( ) next to the status on the record, so they're easy to find. You can access these records in one of two ways:
- Operations Dashboard (
 ). Click the Connected Car status tile on the Fleet Operations dashboard to view active units in the fleet that are currently enrolled or pending enrollment in TSD Telematics, sorted by those that are pending enrollment first.
 - Fleet Hub or Agreement Hub. Click the
 Connected Car search filter check box on the left panel.
© 2026 TSD Rental, LLC